ArduDroid: A Simple 2-Way Bluetooth-based Android Controller for Arduino

UPDATES
- The ArduDroid app on Google Play is no longer active. I have not had the time to update the app to keep up with supported Android versions.
- October 30, 2013 - 7PM (GMT+2)
The new official name for this app is ArduDroid and it can be installed from
Google Play. I changed the name to avoid a naming conflict with another app.
- September 15, 2013: I Have won a
Nexus 7 tablet for this project part of a competition held by Instructables.com Thanks
to
everyone who voted.
- August 18, 2013: I have uploaded the
Arduino 0.11 alpha version with fixes to key bugs reported by
users.
- July 10, 2013: Featured on
MAKEZINE http://makezine.com
- July 8, 2013: Featured on
Hackaday http://goo.gl/Lim0W
- July 7, 2013: I have completed a
comprehensive round of testing and will be uploading the beta, with minor UI
updates.
- July 4, 2013: Featured on Dangerous
Prototypes http://goo.gl/HZatN
INTRODUCTION
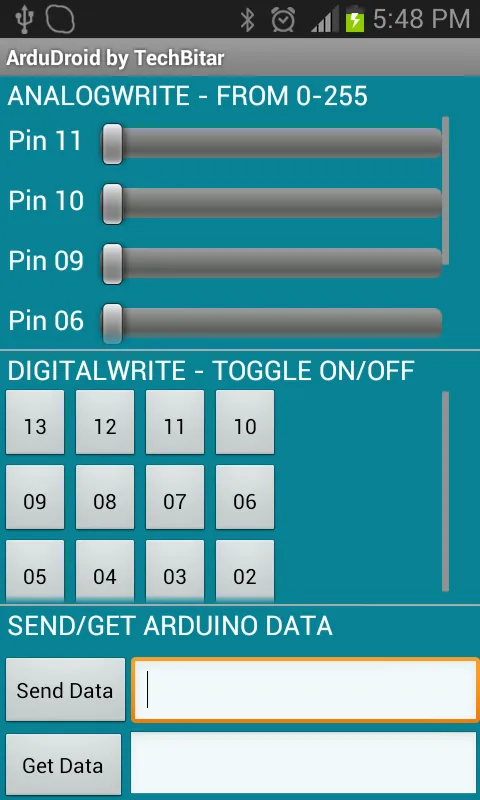
ARDUDROID (formerly Andruino) is a simple Android app to help you control the pins of your Arduino Uno (or clone) from your Android phone wirelessly. It's both an Android app and an Arduino program. ArduDroid employs a simple Android user interface to 1) control Arduino Uno's digital and PWM pins 2) send text commands to Arduino 3) and receive data from Arduino over Bluetooth serial using the ever popular and really cheap (less than $10 from ebay) HC-05 Bluetooth over serial module.
This app has been tested and designed for the HC-05 Serial Bluetooth module. Other Bluetooth modules may or may not work. Also, while I used Arduino Uno in this prototype, feel free to experiment with other models of Arduino.
I have published a guide before on building and programming a circuit with the HC-05 Bluetooth module and Arduino but I will briefly describe again in this guide how to wire the circuit using a breadboard and jumper wires.
Special thanks to engineer Jafar Quttaineh for testing the app and for his invaluable input.
How to use ArduDroid
You can use ArduDroid to send commands to Arduino to control a relay to turn electric
gadgets on/off, control a robot servo, increase/decrease speed of a motor and reverse
direction, dim a light, speed up a fan, and so on. Furthermore, you can read Arduino
pins and sensors then transmit the data back to your android phone.
ArduDroid Components
Hardware
- Android device running version 2.3.3 or higher with Bluetooth.
- Arduino Uno or compatible,
- CD4050 level shifter IC or 2K Ohms & 1K Ohms resistors as voltage dividers.
- HC-05 Bluetooth module. Other
Bluetooth over serial modules may or may not work.
- Breadboard & jumper wires.
- Power source.
Arduino IDE Software
Arduino IDE 1.05 or laterYou can install the latest version of ArduDroid from Google Play.
Certificate fingerprints for 0.11 Alpha (before Google Play):
MD5 : BA:80:C2:6A:68:31:8F:21:D6:FC:08:8E:09:D8:F5:CF
SHA1: 04:EA:2E:47:80:71:BE:D9:D2:ED:86:5F:15:1F:1E:9E:77:62:DB:85
Bug fixes:
- Annoying disconnect message removed.
- Bluetooth connection no longer disconnects when device orientation changes.
2) The ardudroid.ino is the accompanying sketch/firmware for the Arduino Uno
/*
 PROJECT: ArduDroid
 PROGRAMMER: Hazim Bitar (techbitar at gmail dot com)
 DATE: Oct 31, 2013
 FILE: ardudroid.ino
 LICENSE: Public domain
*/

#define START_CMD_CHAR '*'
#define END_CMD_CHAR '#'
#define DIV_CMD_CHAR '|'
#define CMD_DIGITALWRITE 10
#define CMD_ANALOGWRITE 11
#define CMD_TEXT 12
#define CMD_READ_ARDUDROID 13
#define MAX_COMMAND 20  // max command number code. used for error checking.
#define MIN_COMMAND 10  // minimum command number code. used for error checking.
#define IN_STRING_LENGHT 40
#define MAX_ANALOGWRITE 255
#define PIN_HIGH 3
#define PIN_LOW 2

String inText;

void setup() {
  Serial.begin(9600);
  Serial.println("ArduDroid 0.12 Alpha by TechBitar (2013)");
  Serial.flush();
}

void loop()
{
  Serial.flush();
  int ard_command = 0;
  int pin_num = 0;
  int pin_value = 0;

  char get_char = ' ';  //read serial

  // wait for incoming data
  if (Serial.available() < 1) return; // if serial empty, return to loop().

  // parse incoming command start flag
  get_char = Serial.read();
  if (get_char != START_CMD_CHAR) return; // if no command start flag, return to loop().

  // parse incoming command type
  ard_command = Serial.parseInt(); // read the command

  // parse incoming pin# and value
  pin_num = Serial.parseInt(); // read the pin
  pin_value = Serial.parseInt();  // read the value

  // 1) GET TEXT COMMAND FROM ARDUDROID
  if (ard_command == CMD_TEXT){
    inText =""; //clears variable for new input
    while (Serial.available())  {
      char c = Serial.read();  //gets one byte from serial buffer
      delay(5);
      if (c == END_CMD_CHAR) { // if we the complete string has been read
        // add your code here
        break;
      }
      else {
        if (c !=  DIV_CMD_CHAR) {
          inText += c;
          delay(5);
        }
      }
    }
  }

  // 2) GET digitalWrite DATA FROM ARDUDROID
  if (ard_command == CMD_DIGITALWRITE){
    if (pin_value == PIN_LOW) pin_value = LOW;
    else if (pin_value == PIN_HIGH) pin_value = HIGH;
    else return; // error in pin value. return.
    set_digitalwrite( pin_num,  pin_value);  // Uncomment this function if you wish to use
    return;  // return from start of loop()
  }

  // 3) GET analogWrite DATA FROM ARDUDROID
  if (ard_command == CMD_ANALOGWRITE) {
    analogWrite(  pin_num, pin_value );
    // add your code here
    return;  // Done. return to loop();
  }

  // 4) SEND DATA TO ARDUDROID
  if (ard_command == CMD_READ_ARDUDROID) {
    // char send_to_android[] = "Place your text here." ;
    // Serial.println(send_to_android);   // Example: Sending text
    Serial.print(" Analog 0 = ");
    Serial.println(analogRead(A0));  // Example: Read and send Analog pin value to Arduino
    return;  // Done. return to loop();
  }
}

// 2a) select the requested pin# for DigitalWrite action
void set_digitalwrite(int pin_num, int pin_value)
{
  switch (pin_num) {
  case 13:
    pinMode(13, OUTPUT);
    digitalWrite(13, pin_value);
    // add your code here
    break;
  case 12:
    pinMode(12, OUTPUT);
    digitalWrite(12, pin_value);
    // add your code here
    break;
  case 11:
    pinMode(11, OUTPUT);
    digitalWrite(11, pin_value);
    // add your code here
    break;
  case 10:
    pinMode(10, OUTPUT);
    digitalWrite(10, pin_value);
    // add your code here
    break;
  case 9:
    pinMode(9, OUTPUT);
    digitalWrite(9, pin_value);
    // add your code here
    break;
  case 8:
    pinMode(8, OUTPUT);
    digitalWrite(8, pin_value);
    // add your code here
    break;
  case 7:
    pinMode(7, OUTPUT);
    digitalWrite(7, pin_value);
    // add your code here
    break;
  case 6:
    pinMode(6, OUTPUT);
    digitalWrite(6, pin_value);
    // add your code here
    break;
  case 5:
    pinMode(5, OUTPUT);
    digitalWrite(5, pin_value);
    // add your code here
    break;
  case 4:
    pinMode(4, OUTPUT);
    digitalWrite(4, pin_value);
    // add your code here
    break;
  case 3:
    pinMode(3, OUTPUT);
    digitalWrite(3, pin_value);
    // add your code here
    break;
  case 2:
    pinMode(2, OUTPUT);
    digitalWrite(2, pin_value);
    // add your code here
    break;
    // default:
    // if nothing else matches, do the default
    // default is optional
  }
}
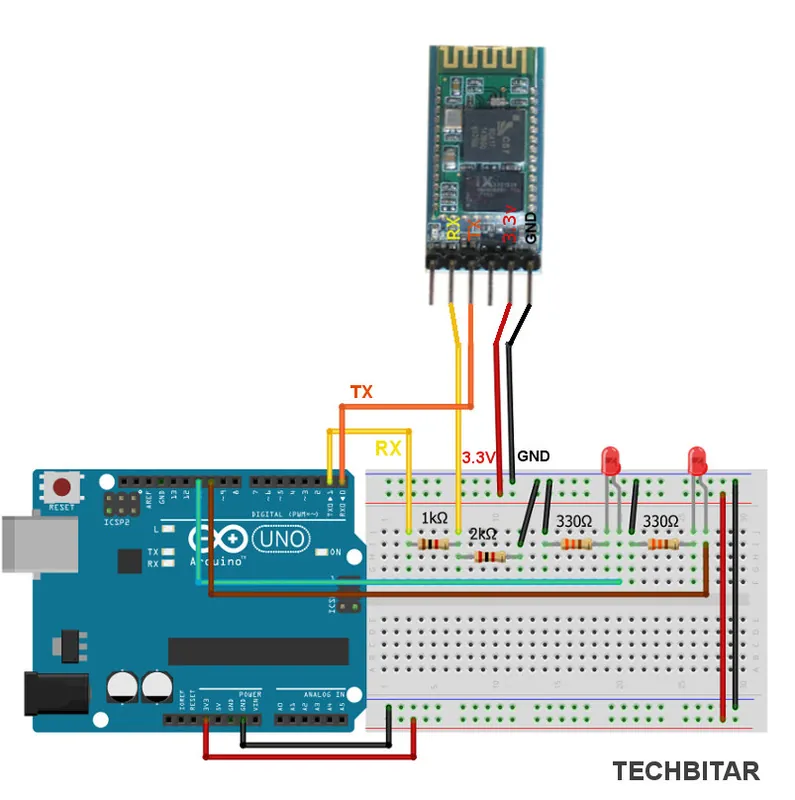
Wiring the Circuit
Please note that while my actual prototype uses the CD4050 IC to level shift from 5V to
3.3V, in the diagram below I am using a voltage divider because I believe it will be simpler
for most people to acquire the resistors than the IC. You only need to drop the
Arduino's TX voltage to 3.3V to match the RX of the HC-05. The Arduino's RX pin can handle
the HC-05 incoming TX signal which is 3.3V.
I used 2K and 1K ohms resistors in my circuit diagram to drop 5V to 3.3V but you can use different resistor values. Google "voltage divider calculator" and use the myriad calculators to determine what other resistor values work best for you.
I used 2K and 1K ohms resistors in my circuit diagram to drop 5V to 3.3V but you can use different resistor values. Google "voltage divider calculator" and use the myriad calculators to determine what other resistor values work best for you.
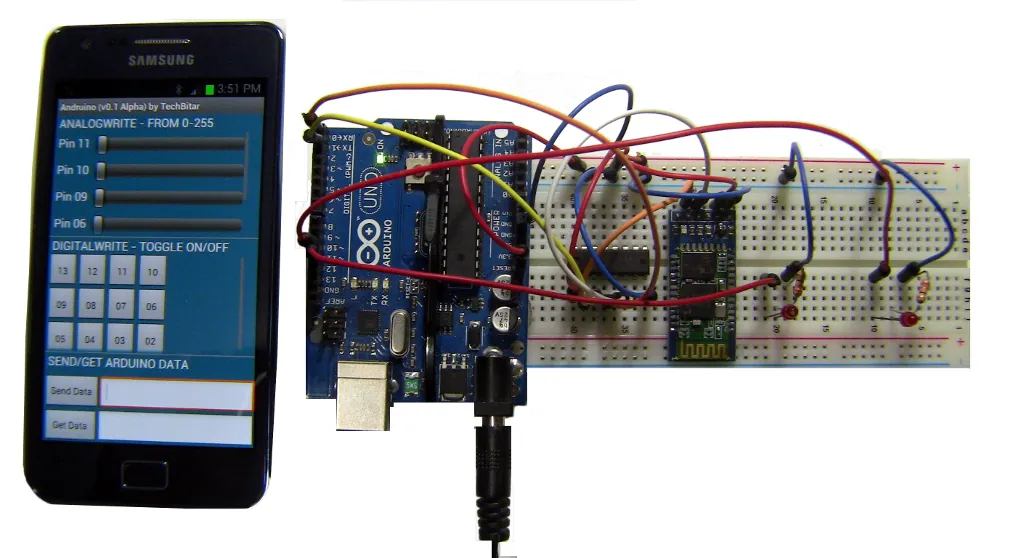
Andruino running on my android and next to it a test circuit using the HC-05 Bluetooth
module.
How to modify the Arduino companion program
On the Arduino side I have included a skeletal program that intercepts and processes
the ArduDroid Commands issued from your Android device. You can update the
Arduino code according to your project needs.
ArduDroid is both an Android app that sends/receives data from Arduino with the help of an Arduino sketch named ardudroid.ino In this sketch, there are four code blocks supporting the four key functions of ArduDroid. You can modify these code blocks to suit your requirements.
They are labeled according to their function in a comment line at the start of each code block. I inserted a comment "// add your code here" to help you find and place your code, but you can decide how you wish to modify the functional code blocks.
1) Control analogWrite pins
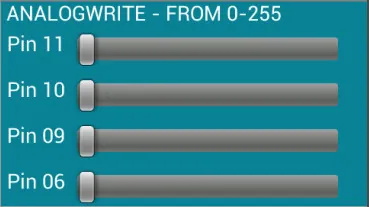
This is the code block that receives the
PWM value from 0 to 255 that you send from Android to control the PWM designated Arduino
Uno pins 11,9,10,5,4,3. You can add code to control a motor for a robot or fan, for
example, to speed it up or slow it down. Or you can send a command to dim a
// 3) GET analogWrite DATA FROM ARDUDROID
if (ard_command == CMD_ANALOGWRITE) {
  analogWrite(pin_num, pin_value);
  // add your code here
  return; // Done. return to loop();
}
2) Control digitalWrite pins
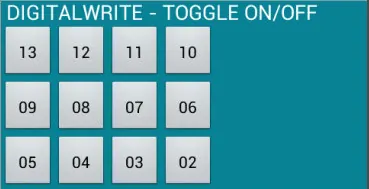
This is the code block that receives from
Android the pin number and the ON/OFF (HIGH/LOW) value to toggle the corresponding pin.
You can turn a relay on /off to switch an electrical device. Please note
that this code block calls a function set_digitalwrite() which has a
Switch/Case structure to give you room to write code to act on each pin
// 2) GET digitalWrite DATA FROM ARDUDROID
if (ard_command == CMD_DIGITALWRITE) {
  if (pin_value == PIN_LOW) pin_value = LOW;
  else if (pin_value == PIN_HIGH) pin_value = HIGH;
  else return; // error in pin value. return.
  set_digitalwrite(pin_num, pin_value); // Uncomment this function if you wish to use
  return; // return from start of loop()
}

// 2a) select the requested pin# for DigitalWrite action
void set_digitalwrite(int pin_num, int pin_value) {
  switch (pin_num) {
    case 13:
      pinMode(13, OUTPUT);
      digitalWrite(13, pin_value);
      // add your code here
      break;
    // ...
    // ...
    case 2:
      pinMode(2, OUTPUT);
      digitalWrite(2, pin_value);
      // add your code here
      break;
      // default:
      // if nothing else matches, do the default
      // default is optional
  }
}
3) Send text/command from Android to Arduino
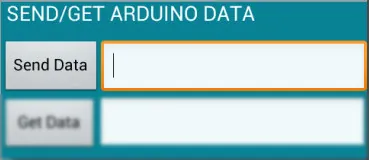
This is the code block that handles the text you type in the field next to Send Data button.
For example, you can send a password to activate/login into a system. Or you can send
// 1) GET TEXT COMMAND FROM ARDUDROID
if (ard_command == CMD_TEXT) {
  inText = ""; // clears variable for new input
  while (Serial.available()) {
    char c = Serial.read(); // gets one byte from serial buffer
    delay(5);
    if (c == END_CMD_CHAR) { // if we the complete string has been read
      // add your code here
      break;
    } else {
      if (c != DIV_CMD_CHAR) {
        inText += c;
        delay(5);
      }
    }
  }
}
4) GET TEXT/COMMAND FROM ARDUINO
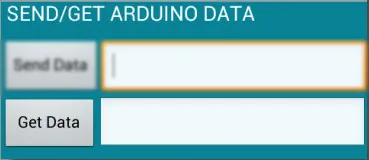
This code block sends anything you want from
Arduino to your Android. In my sample code below, I send the value of analog
pin 0 whenever I press the Get Data button. Since analog pin is not connected to
anything in the demo video, I was getting ambient noise values. Please note that there is no error
detection/correction in my code block. If accuracy is critical to your app,
make
sure you add error detection such as visual markers to enclose the data being
sent or a
// 4) SEND DATA TO ARDUDROID
if (ard_command == CMD_READ_ARDUDROID) {
  // char send_to_android[] = "Place your text here." ;
  // Serial.println(send_to_android); // Example: Sending text
  Serial.print(" Analog 0 = ");
  Serial.println(analogRead(A0)); // Example: Read and send Analog pin value to Arduino
  return; // Done. return to loop();
}
Alternatives to ArduDroid
There are a quite a few solutions to enable
Android-Arduino integration. The more expensive ones involve specialized and
costly hardware such as Google's ADK, but by far the cheapest and in my opinion
the simplest is the Bluetooth integration using the HC-05. I expect WiFi to
eventually replace Bluetooth with the help of WiFi Direct (point to point WiFi
communications without a router) but his is a couple of years down the
road.
BACKGROUND
The HC-05 Bluetooth module and its siblings are byAndroid to Arduino communication, you can find a few approaches to pick from depending on your project needs and the degree of abstraction you are looking for. Some approaches use a terminal app on the Android such as Blueterm to send and receive raw text data from Arduino over Bluetooth SPP. Others solutions employ a comprehensive library such as Amarino. My ArduDroid sits in the middle.License
Copyright 2013 Hazim Bitar Licensed under the Apache License, Version 2.0 (the "License");
you may not use this file except in compliance with the License.
You may obtain a copy of the License at http://www.apache.org/licenses/LICENSE-2.0
Unless required by applicable law or agreed to in writing, software distributed under the License is distributed on an "AS IS" BASIS, WITHOUT WARRANTIES OR CONDITIONS OF ANY KIND, either express or implied. See the License for the specific language governing permissions and limitations under the License.
NOTES
I will do my best to support ArduDroid in my spare time and I am hoping those of you
who find this tool useful will share expertise with others. Please drop me a note if you run
into any bugs running ArduDroid on your device. Kindly note the device model and OS version
as well as other useful info.
You can drop me a note via the contact form or email techbitar at gmail dot com.
You can drop me a note via the contact form or email techbitar at gmail dot com.